

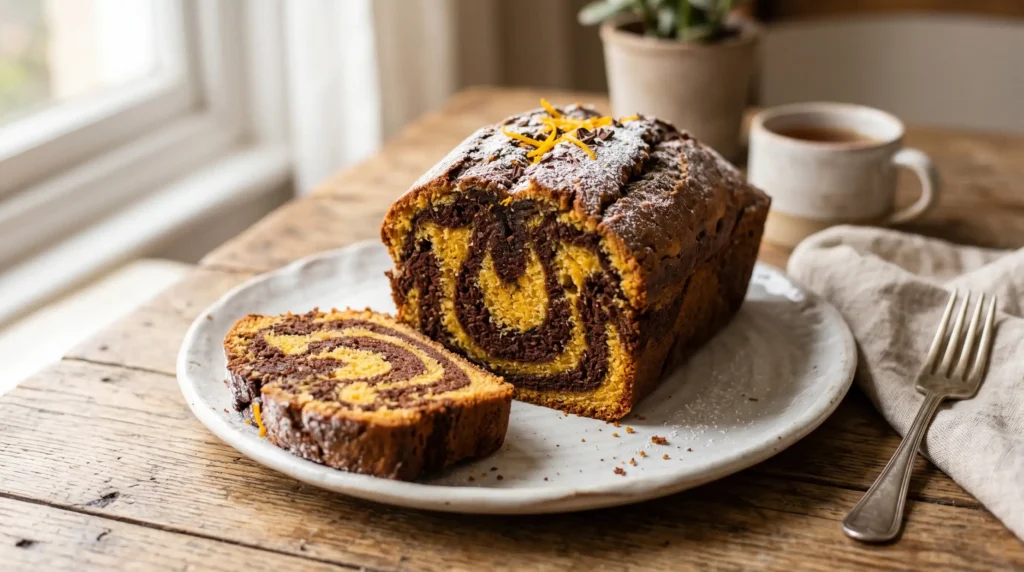
There is something about this mary berry chocolate and orange marble cake recipe that feels like it belongs to a different, slower kind of day the sort where the kitchen smells warm and someone is always hovering near the oven. At its heart, it is a beautifully light, moist sponge built from two distinct batters, one carrying deep chocolate richness from rich cocoa and the other bright with fresh citrus and zesty orange flavour. Swirled together just enough to create a stunning marbled effect, every single slice delivers a perfectly balanced taste that never leans too far in either direction. What I love most is how fluffy and tender the crumb stays even the next day this is a genuinely reliable bake that holds its texture beautifully, whether you are making it as a loaf cake or spreading it out as a tray bake for a crowd.
The magic of this timeless classic is how effortlessly it moves between everyday baking and special occasions without changing a single thing. I first made it years ago from a dog-eared cookbook at my nan’s house, and even now it carries that same quiet pull of nostalgia, family, and cherished moments baked right into it. Ready in just 1 hour and 15 minutes from start to finish, it is as easy and foolproof as mary berry recipes always are impressive enough for afternoon tea with guests, yet simple enough to throw together on a Tuesday with no fuss. The blending of deep chocolate and bright orange is not just a zesty twist on a familiar formula it is the kind of combination that becomes one of those memories you keep coming back to bake again.
Mary Berry Chocolate and Orange Marble Cake Recipe
Ingredients
| # | Category | Ingredient | Quantity |
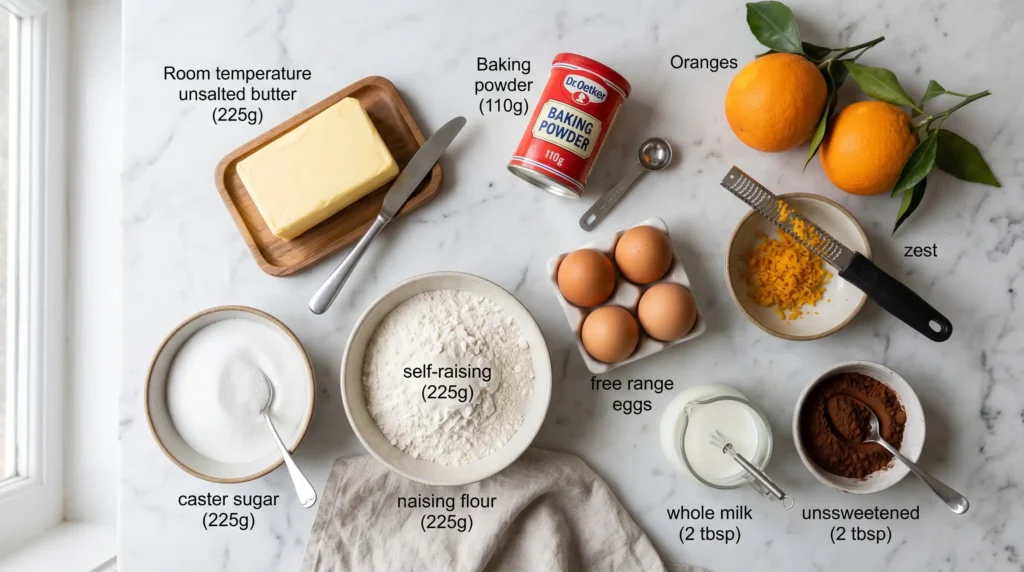
| 1 | Cake Batter | Unsalted butter, softened (or baking spread) | 225g (8oz) |
| 2 | Cake Batter | Caster sugar | 225g (8oz) |
| 3 | Cake Batter | Self-raising flour | 275g (10oz) |
| 4 | Cake Batter | Baking powder | 1-2 tsp |
| 5 | Cake Batter | Large eggs | 4 |
| 6 | Cake Batter | Milk | 2 tbsp |
| 7 | Cake Batter | Vanilla essence | ½ tsp |
| 8 | Cake Batter | Zest of orange | 1 large orange or 2 oranges |
| 9 | Cake Batter | Fresh orange juice | 1 tbsp |
| 10 | Chocolate Mixture | Cocoa powder | 2 tbsp |
| 11 | Chocolate Mixture | Hot water | 1-2 tbsp |
| 12 | Chocolate Mixture | Chocolate chips (optional) | 50g |
| 13 | Finishing | Butter, for greasing tin | As needed |
| 14 | Finishing | Baking parchment | As needed |
| 15 | Finishing | Icing sugar, for dusting | As needed |
| 16 | Icing (Optional) | Icing sugar | 1 cup |
| 17 | Icing (Optional) | Butter, softened | 1 tbsp |
| 18 | Icing (Optional) | Milk | 1-2 tbsp |
| 19 | Icing (Optional) | Plain chocolate | 50g |
| 20 | Icing (Optional) | White chocolate | 50g |
Why This Cake Has Never Gone Out of Style
Mary Berry has long been called the queen of baking, and this marble cake is one of the clearest reasons why. It is moist, genuinely easy to pull together, and those beautiful swirls of chocolate running through the batter never fail to impress whoever you put it in front of whether that is a table full of guests at family gatherings or just one person sneaking a slice straight from the tin. I have made this at least a dozen times over the years and it suits every occasion without ever feeling out of place a relaxed teatime treat one week, an after-school treat the next, and somehow always the right call.
What keeps this recipe feeling fresh rather than dated is how naturally it welcomes creative adjustments without losing what makes it work. The chocolate and vanilla combination is the foundation, but the chocolate orange variation swapping the vanilla side for a bright, zesty orange batter is where things get genuinely exciting. That small shift transforms the whole personality of the cake while keeping everything that makes it moist, reliable, and deeply satisfying intact. It is the kind of recipe that a confident baker passes down and a nervous one discovers with relief and either way, it always delivers.
How to Build the Batter and Get That Swirl Right
Mary Berry Chocolate and Orange Marble Cake Recipe Start by setting up your tin before anything else preheat the oven to 180°C, 160°C fan, or gas 4, then grease and line your chosen tin with non-stick baking parchment. This recipe works in a 900g (2lb) loaf tin, a 20cm round cake tin, or a 23x30cm roasting tray depending on how you want to serve it. Once that is done, add the butter, caster sugar, eggs, flour, baking powder, milk, and orange zest into a large mixing bowl and beat with an electric mixer for about 2 minutes until the mixture is light, fluffy, smooth, pale, and fully combined. Now divide the batter spoon either one third or half into a second bowl depending on how strong you want the chocolate presence to be. Into the first bowl, fold in the fresh orange juice to deepen the citrus side, and into the second, stir the cocoa powder into a little hot water to form a smooth paste before folding it through to create the chocolate batter. If you like, a touch of vanilla added to the plain orange batter rounds the flavour out beautifully.
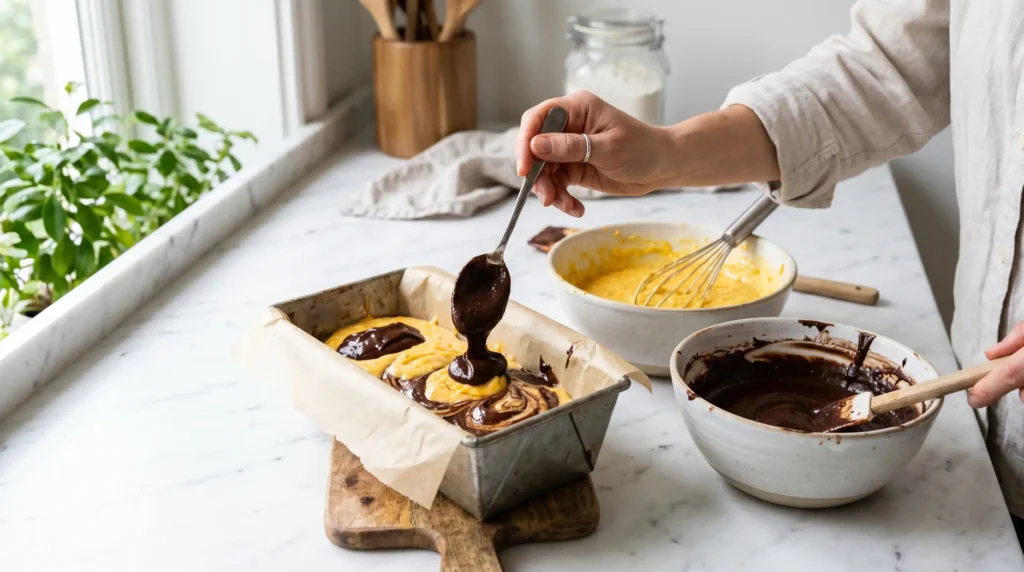
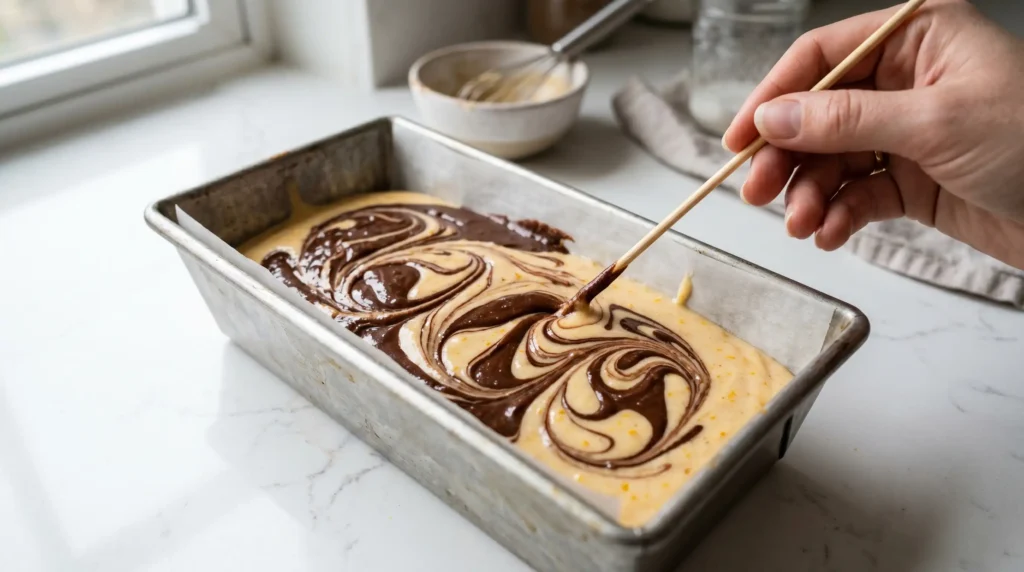
Now comes the part that looks harder than it actually is. Spoon alternating dollops or alternate dollops if you prefer a more randomly placed effect of the plain orange batter and chocolate batter into the prepared tin. Once all the batter is in, use a skewer or knife to swirl through the mixture just once or twice to build the marble effect and marbled pattern and then stop. Every time I have been tempted to do one more pass, the pattern blurs and you lose those clean swirls, so resist the urge to overmix. Level the surface gently with a spatula, then bake for 45 to 50 minutes in a round tin or 50-60 minutes in a loaf tin, until well risen and a skewer inserted into the centre comes out clean. Leave to cool in the tin for 10 minutes, then turn out onto a wire rack to cool completely before you dust lightly with icing sugar, slice, and serve.
Small Habits That Make a Big Difference
The single most important thing I have learned making this cake repeatedly is to use a genuinely light hand when swirling the batters together. No more than one or two passes with a skewer using long, gentle strokes is all it takes to build a defined pattern the moment you go further, blending kicks in and those beautiful colours disappear into a flat, muddy brown that looks nothing like a proper marble. On the density side, a dense crumb almost always means either overmixed batter or butter that was too cold going in always use softened butter or a good baking spread, make sure your eggs are at room temperature, and mix only until just combined for the lightest, most even crumb possible. If you want a more pronounced citrus flavour, add a few drops of orange extract alongside the zest it amplifies the brightness without adding any extra liquid.
For doneness, the cake should look golden on top, feel springy when gently pressed, and a skewer pushed into the centre should come out completely clean these three things together tell you it is ready. If you are making a traybake version in a 30x23cm (12x9in) tin, reduce the baking time to around 35-40 minutes and start checking early since thinner layers cook faster. Once the cake is fully cooled, the finishing options are genuinely worth exploring a silky chocolate ganache poured over the top adds richness and depth, while a zesty orange glacé icing made simply from icing sugar and orange juice keeps things lighter and lets that citrus flavour shine through cleanly.
Fun Ways to Make This Recipe Your Own
One of the things I genuinely enjoy about this cake is how well it adapts without losing its charm. The most practical switch is turning it into a tray bake spread the batter into a large flat tin, bake until golden, and cut into neat squares once cooled. It travels well, portions easily, and works perfectly for picnics, casual office treats, or laid-out spreads at parties where people want something homemade but not fussy. For a more flavourful twist on the vanilla mixture, add an extra teaspoon of orange extract alongside the orange zest to make the citrus side noticeably more fragrant and bold the contrast against the deep chocolate batter becomes even more striking, and the overall refreshing flavor of the finished cake feels livelier and brighter with every slice.
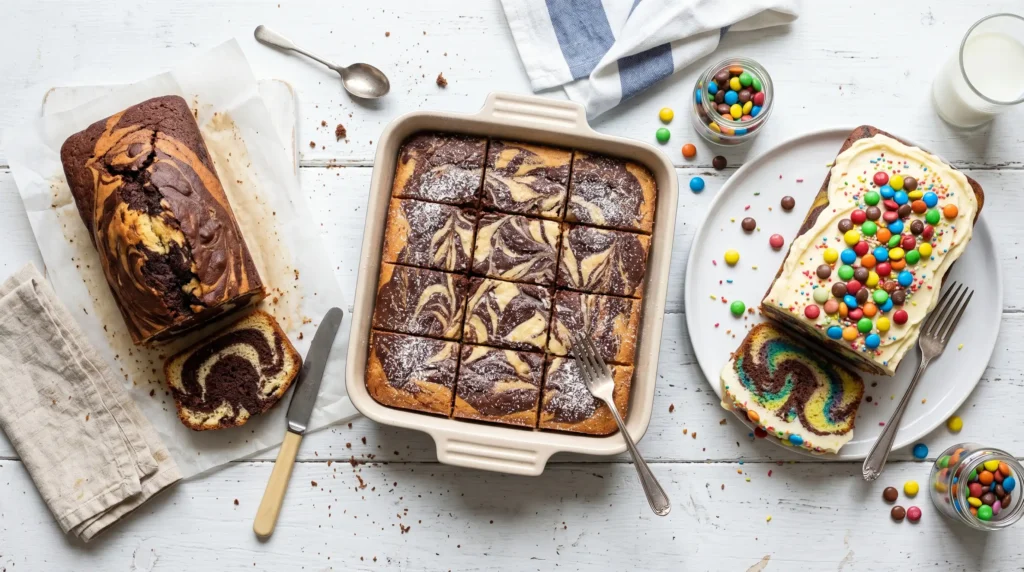
If you are baking for younger guests or just want something more playful and eye-catching, there is a lot of room to have fun here. A few drops of food coloring stirred into the vanilla mixture before swirling creates unexpected rainbow swirls that look spectacular when sliced, especially for birthdays or celebration bakes. Instead of or alongside chocolate chips folded into the batter, scatter colorful candy or mini M&Ms over the top just before baking they hold their shape well and add little bursts of colour and texture that make the cake look as fun as it tastes. These are small changes but they completely shift the mood of the bake depending on who you are making it for.
What to Put on the Table Alongside It
This loaf cake is genuinely one of those bakes that needs very little help, but the right accompaniment can quietly lift the whole experience. A simple cup of tea English breakfast or Earl Grey both work beautifully or a strong coffee is honestly all most people need alongside a light dusting of icing sugar over the top of each slice. The bitterness of the coffee in particular plays off the chocolate and orange in the cake in a way that feels intentional rather than accidental. I have served this at countless afternoon gatherings and the pairing never fails people always go back for a second slice when there is a good brew involved.
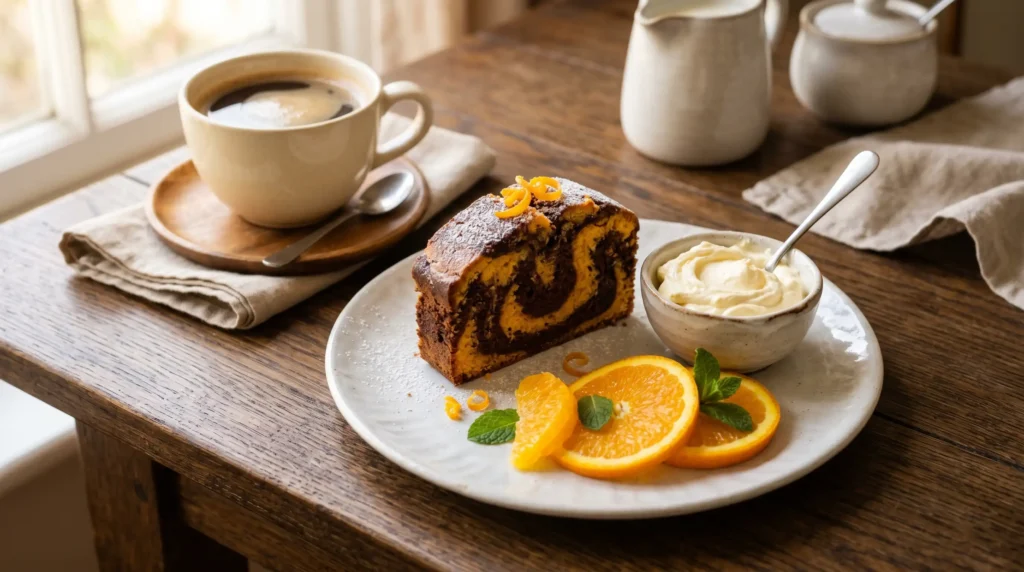
If you want to lean into something more indulgent, a generous dollop of clotted cream or a spoonful of cool crème fraîche on the side adds a rich, creamy contrast that balances the citrus brightness perfectly. Whipped cream is a lighter option that works just as well if you want the indulgence without the heaviness. For a more dressed-up finish, drizzle a little warm chocolate glaze over each portion just before serving — it creates a noticeably richer finish that feels almost like a restaurant dessert. A few fresh orange slices laid alongside the plate add colour, a refreshing sharpness, and a visual nod to the flavour inside the cake that I always find quietly satisfying.
Storing It So It Stays Just as Good
One thing I always tell people who make this cake is that it actually improves slightly by the second day once the chocolate and orange flavours have had time to settle into each other. At room temperature, keep it in an airtight container in a cool, dry place and it will stay genuinely moist for up to 3 days some versions hold well for 4 days if your kitchen is not too warm. There is no need to refrigerate it for short-term storage, but if you want to stretch it to 5 days, the fridge works fine just be aware that cold air can slightly affect the texture, so always bring it back to room temperature before serving to get the best out of every slice.
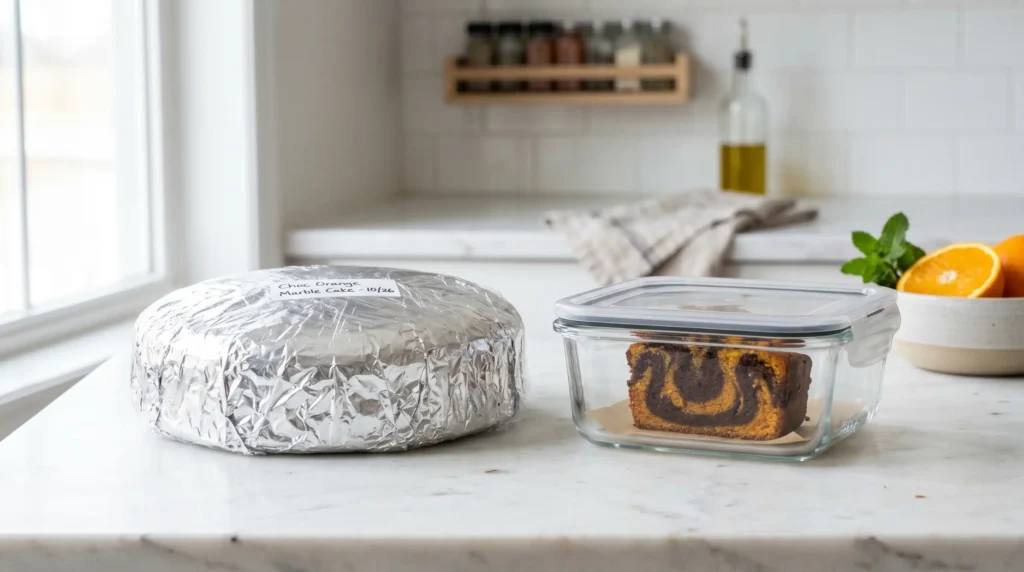
For longer storage, this cake freezes beautifully and it is something I do regularly when I bake a large batch. Wrap the cooled loaf tightly in cling film or plastic wrap, then add a layer of foil over the top to protect it fully this double wrapping makes a real difference to how well it keeps. Stored this way, the whole loaf will last for up to 3 months, and individual slices wrapped separately are just as good for up to 2 months, which makes them handy to pull out one at a time. When you are ready to eat, simply thaw at room temperature for a few hours and it comes back almost exactly as it was when freshly baked.
Nutrition
Understanding what goes into each slice helps you enjoy this cake without any guesswork, and the numbers here are honest and reasonable for a proper homemade bake. Calories sit somewhere between 350-400 kcal per serving depending on the version you make the richer cream cheese or ganache topped versions nudge closer to 390 kcal. Carbohydrates come in at around 45g per slice, which reflects the flour and sugar content you would expect from a classic sponge, while protein lands at a modest 6g largely from the eggs and milk in the batter. These are all estimated figures and will naturally vary based on the exact ingredients and quantities you use at home.
On the fat side, expect around 18g to 20g of fat per serving, with saturated fat at approximately 12g this comes primarily from the butter and eggs that give the cake its rich, tender crumb. Sodium is relatively low at around 220mg, which is reassuring for a bake of this size and depth of flavour. All values are approximate and can shift noticeably depending on your cooking methods, whether you add icing or a chocolate glaze, and the specific brands of ingredients you reach for. Treat these figures as a helpful guide rather than a fixed rule a single slice of something this good is always worth it.
Answers to the Questions Worth Asking
Q: Can I use fresh orange juice instead of zest?
Zest always delivers a stronger flavour without adding extra liquid. You can add fresh orange juice but reduce the milk slightly to keep the consistency of the batter properly balanced.
Q: Can I use plain flour instead of self-raising?
Yes. If you only have plain flour or all-purpose flour, add 2 teaspoons of baking powder per 150g (1 cup) of flour. This recipe needs around 3.5 teaspoons in total to compensate properly.
Q: What cocoa powder works best?
Always use a good quality unsweetened cocoa powder for the deepest rich chocolate flavour and most deep colour in the chocolate batter. Cheaper versions produce a duller result that does not show up well against the orange swirls.
Q: Can I add chocolate chips?
Yes. Fold 50g of chocolate chips into the chocolate batter just before spooning it into the tin. It adds a genuinely chocolatey bite to every slice without changing anything else.
Q: Can I make this cake ahead of time?
Absolutely. It keeps beautifully in an airtight container and can be frozen for up to 2 months, making it ideal to prepare in advance.
Q: How long does it bake in a loaf tin?
In a loaf tin, expect a baking time of around 55 to 60 minutes. Always check doneness with a skewer the skewer test is the only reliable way to know the centre is fully set.
Q: Why did my cake sink in the middle?
A cake that sinks in the middle is almost always either underbaked or caused by opening the oven door too early. Wait until at least the 55 minute mark before checking.
Q: Can I make this cake gluten-free or vegan?
Yes, this recipe can be adapted to be gluten-free or vegan with the right ingredient substitutions, though the swirls and overall consistency may vary slightly depending on what you use.


flakes, adds a richness that turns a humble tea loaf into something genuinely special perfect for serving guests or simply treating yourself on a slow
Thanks for Your compliment
sift in your self-raising flour, cocoa powder, and baking powder into the wet ingredients so the cocoa is properly distributed throughout. Using an electric,
Sure